Thursday, June 7, 2012

55 Hearts of JOY!


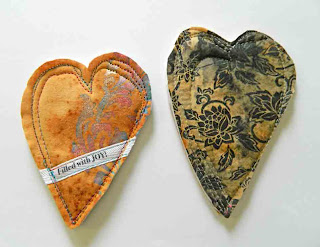
Yahoo! I just finished the 55th heart. Only 45 more to go. I can hardly wait to give the packets away at work and see what happens as they travel around the department. The photo above is about half of the bunch.


I found the hearts were becoming very regular and exact, so made a conscious effort today to stitch inside or outside the heart outline and make each one asymmetrical.


TIPs for stitching several hearts on a slab of fabric:
1. Keep the slab small to medium size. A large slab becomes unwieldy, as you're trying to maneuver it 360 degrees under the sewing machine needle.

2. Don't get too close to the edge of the fabric. Allow about 1" to prevent puckers and bunches as you round the curves close to the edge.

3. Select a thread that works with more than one fabric to avoid having to constantly change upper thread. I used a rainbow variegated thread and really like the contrast against the rusted fabrics.

4. Choose a fine bobbin thread for the bottom. More fits on a bobbin at a time and reduces the number of times you have to stop to wind and change bobbins.


Joy is Contagious (above) is made from what I thought would be backing fabric. It started out as white fabric with a sketchy black plaid. The rust and tannin created irregular areas of texture and color (I love serendipity).


This reminds me of the shirts my dad wore when I was a child. He'd laugh and shake his head at the rust. He was a most gentle soul and would like the way we are passing the joy along in JOY Jam! Thanks for joining me!!

Tuesday, June 5, 2012

Almost to the half-way point!


Working on the JOY Jam hearts in my beautiful studio really makes me happy! I love the feel of the fabric underneath the paintbrush or thread. Making a heart with someone special in mind makes me giggle to myself.


Yes, it sounds so Pollyanna, but I LOVE to see someone smile when they find a gift in their favorite color or with a special message just for them.


There are now 40 JOY Jam hearts on my work table, waiting for their cards to be attached. Others are on the paint table, drying and there is a stack to be sewn beside the sewing machines. Oops! Need to print some more twill tape.

I can't wait to pass these out!!


Saturday, June 2, 2012

Design out of context

It always fascinates me to see what happens when a portion of a design is removed from context to stand alone. Sometimes it makes the fragment look complex and sometimes it just looks contrived.

So, I was very pleased to see the hearts for JOY Jam from a tattoo-looking stencil. This is way out of my comfort zone, but while thinking about how to make hearts to appeal to the mostly male population of co-workers, my friend Bill (he's "Bill-iant") became the inspiration.

Bill is young enough to be my son, about 6' 3", and a musician. He's smart, interesting, comes from a very different background than I, and has tattoos that take my breath away. They (the tattoos) tell a story of the battle between good and evil and extend from his lower calf to up over his shoulder—at least the parts that are visible. 

Searching through my stash of kewl stencils, this one caught my eye. It kind of looks like what I think a tattoo should look like—and the rust-dyed fabric with pale tannic-acid grays was the perfect background.


Here they are cut out!! How amazing are these? I think even the über cool Bill will like them.


The heart count is now 29 toward the goal of 100 hearts for JOY Jam! There is still a long way to go, but this afternoon in the studio has been quite productive and I'm happy!

Anyone else have photos of their JOY Jam hearts to share yet?

Makin' some JOY!

Heading to the studio to may some JOY to share!

My mom used to say "All work and no play makes Beth a dull girl." So, today is a play day—in the studio.

That means there should be photos to share a little later. Yahoo!

Thursday, May 31, 2012

99 Fabric Hearts on the Wall!

99 fabric hearts on the wall!!


This is a quick post before rushing off to work. The heart above was one made in the tutorial yesterday. It has been embellished with rolled-ribbon roses and deep pink freshwater pearls. Only 99 more to go!


Linda from Cloth Creativity blog shares hearts she made with ribbons for the JOY Jam project. She is honoring the memory of her father by sharing the hearts with family and loved ones. Read her post here: http://www.cloth-creativity.blogspot.com/2012/05/joy-jam.html


I'm so honored so many online friends are putting their own spin on JOY Jam and joining in. We each make a difference!!

Wednesday, May 30, 2012

JOY Jam Hearts Tutorial

JOY Jam Hearts Tutorial


Easy peasy! The hardest part is choosing fabric, thread, and encouraging words. These two hearts, including taking the photos, took less than 45 minutes. 


1. Fuse fleece on the back of the fabric for the front. I really love rust-dyed fabric and save all the scraps, as well as scraps of fusible fleece. So far, all supplies for the two dozen hearts completed for Joy Jam have come from the scrap bin. LOVE that!


1. Apply my favorite metallic fabric paint (Earth Safe Finished opaque Shimmers) through a gorgeous stencil. This 6"-square stencil is from The Crafters Workshop.


3. While the paint is still wet, brush two colors of mica powders onto the open stencil areas and brush lightly to blend.


4. While the paint is drying, cut heart templates from cardstock. 


5. The paint dries in just a few minutes. It’s easy to move the template around on the fabric to preview the look of the finished heart.


6. I've adjusted the contrast so you can see the pencil outline of the two hearts on the stenciled fabric. It would not have been possible to get a third heart out of this, because the seam allowances need to be added to the outline. 


7. Position the printed twill tape (tutorial posted yesterday) on each of the hearts and stitch in place through all layers with a straight stitch.


The backing is also rusted fabric (yes, I rust printed fabric as well as solids) with fusible fleece bonded to the wrong side.


8. Front and back are placed together with fleece sides together. I really have to concentrate to make wonky stitching along the pencil marks, but several trips around the hearts with variegated thread provide a nice texture and color.


9. When the stitching is complete, cut around the stitching adding a small “seam allowance.” No, I don't measure.


Front and back. I love the serendipitous nature of rust-dyeing print fabrics! It has inspired me to look at the fabric bins in a whole new way.


Here are the two Joy Jam hearts ready for final embellishment (or not). Some of the recipients of my 100 hearts will be testosterone units (men) and will appreciate hearts free of lace, beads, buttons, and charms.

I hope you choose to join me in Joy Jam. Whether you make three hearts or three hundred, passing them to friends, associates, colleagues, or strangers on the street is a fun way to share JOY with someone and it will make you smile inside and out!!

Tuesday, May 29, 2012

Printing On Twill Tape Tutorial

 Here are the step-by-steps for printing on twill tape that you can actually see!


1. Set up a Word (or other word-processing) document in horizontal (back and forth, rather than up and down) orientation. Position the cursor in about the center of the page and key the words you would like.


2. Draw an arrow on the bottom of the paper at the edge going into the printer first. This helps when you are trying to print the second time. Print the words on the paper. Cover the words with double-sided tape, leaving a border on each side.


3. Cover the double-sided tape with cotton twill tape. It is important for the tape to be 100% cotton. You can purchase synthetic twill tape in packages in the fabric store, but these will bleed badly and produce disappointing results. (I've made this mistake so you don't have to!)

I buy white and natural-colored 100% cotton twill tape at my local quilt store and on Ebay. Notice the roll in the upper right corner above. It was a 25-yard roll of 3/8"-wide herringbone weave twill tape purchased on Ebay at a very good price.

Twill tape is available in many widths. I've used 1/4"-wide all the way up to 1 1/2"-wide (think of small photos printed on the tape.).


4. Put the paper, with the twill tape, in the printer with the arrow pointing toward the printer and print a second time. This time the print will be on the tape.


5. The double-sided tape grips the paper more than the twill tape, making it easy to remove the printed twill tape. If your printer uses pigment-base ink, you don't need to do anything additional. The tape is ready to put on your project.
NOTE: If your printer uses dye-base ink, you need to spray both sides of the twill tape with a clear acrylic spray (like spray paint), such as Krylon. This will seal the ink, preventing moisture from getting to it and causing the  printed words to run or wick.

Tomorrow, I'll put up step-by-step photos of making the heart. The photos are finished, but it's about time to leave for work. Hope you enjoy this and decide to join me in the Joy Jam project!!