Thursday, May 31, 2012

99 Fabric Hearts on the Wall!

99 fabric hearts on the wall!!


This is a quick post before rushing off to work. The heart above was one made in the tutorial yesterday. It has been embellished with rolled-ribbon roses and deep pink freshwater pearls. Only 99 more to go!


Linda from Cloth Creativity blog shares hearts she made with ribbons for the JOY Jam project. She is honoring the memory of her father by sharing the hearts with family and loved ones. Read her post here: http://www.cloth-creativity.blogspot.com/2012/05/joy-jam.html


I'm so honored so many online friends are putting their own spin on JOY Jam and joining in. We each make a difference!!

Wednesday, May 30, 2012

JOY Jam Hearts Tutorial

JOY Jam Hearts Tutorial


Easy peasy! The hardest part is choosing fabric, thread, and encouraging words. These two hearts, including taking the photos, took less than 45 minutes. 


1. Fuse fleece on the back of the fabric for the front. I really love rust-dyed fabric and save all the scraps, as well as scraps of fusible fleece. So far, all supplies for the two dozen hearts completed for Joy Jam have come from the scrap bin. LOVE that!


1. Apply my favorite metallic fabric paint (Earth Safe Finished opaque Shimmers) through a gorgeous stencil. This 6"-square stencil is from The Crafters Workshop.


3. While the paint is still wet, brush two colors of mica powders onto the open stencil areas and brush lightly to blend.


4. While the paint is drying, cut heart templates from cardstock. 


5. The paint dries in just a few minutes. It’s easy to move the template around on the fabric to preview the look of the finished heart.


6. I've adjusted the contrast so you can see the pencil outline of the two hearts on the stenciled fabric. It would not have been possible to get a third heart out of this, because the seam allowances need to be added to the outline. 


7. Position the printed twill tape (tutorial posted yesterday) on each of the hearts and stitch in place through all layers with a straight stitch.


The backing is also rusted fabric (yes, I rust printed fabric as well as solids) with fusible fleece bonded to the wrong side.


8. Front and back are placed together with fleece sides together. I really have to concentrate to make wonky stitching along the pencil marks, but several trips around the hearts with variegated thread provide a nice texture and color.


9. When the stitching is complete, cut around the stitching adding a small “seam allowance.” No, I don't measure.


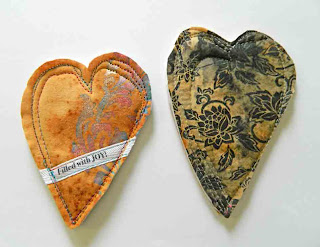
Front and back. I love the serendipitous nature of rust-dyeing print fabrics! It has inspired me to look at the fabric bins in a whole new way.


Here are the two Joy Jam hearts ready for final embellishment (or not). Some of the recipients of my 100 hearts will be testosterone units (men) and will appreciate hearts free of lace, beads, buttons, and charms.

I hope you choose to join me in Joy Jam. Whether you make three hearts or three hundred, passing them to friends, associates, colleagues, or strangers on the street is a fun way to share JOY with someone and it will make you smile inside and out!!

Tuesday, May 29, 2012

Printing On Twill Tape Tutorial

 Here are the step-by-steps for printing on twill tape that you can actually see!


1. Set up a Word (or other word-processing) document in horizontal (back and forth, rather than up and down) orientation. Position the cursor in about the center of the page and key the words you would like.


2. Draw an arrow on the bottom of the paper at the edge going into the printer first. This helps when you are trying to print the second time. Print the words on the paper. Cover the words with double-sided tape, leaving a border on each side.


3. Cover the double-sided tape with cotton twill tape. It is important for the tape to be 100% cotton. You can purchase synthetic twill tape in packages in the fabric store, but these will bleed badly and produce disappointing results. (I've made this mistake so you don't have to!)

I buy white and natural-colored 100% cotton twill tape at my local quilt store and on Ebay. Notice the roll in the upper right corner above. It was a 25-yard roll of 3/8"-wide herringbone weave twill tape purchased on Ebay at a very good price.

Twill tape is available in many widths. I've used 1/4"-wide all the way up to 1 1/2"-wide (think of small photos printed on the tape.).


4. Put the paper, with the twill tape, in the printer with the arrow pointing toward the printer and print a second time. This time the print will be on the tape.


5. The double-sided tape grips the paper more than the twill tape, making it easy to remove the printed twill tape. If your printer uses pigment-base ink, you don't need to do anything additional. The tape is ready to put on your project.
NOTE: If your printer uses dye-base ink, you need to spray both sides of the twill tape with a clear acrylic spray (like spray paint), such as Krylon. This will seal the ink, preventing moisture from getting to it and causing the  printed words to run or wick.

Tomorrow, I'll put up step-by-step photos of making the heart. The photos are finished, but it's about time to leave for work. Hope you enjoy this and decide to join me in the Joy Jam project!!

Monday, May 28, 2012

JOY Jam Hearts from Rusted Fabric


Here are a few more hearts for the Joy Jam project. These are made with rust-dyed fabric, which is treated to surface design of some yummy stenciled  metallic fabric paint (Earth Safe Finishes copper Opaque Shimmers and The Crafters Workshop stentcils).


Keep in mind, I have about 15 minutes a day to devote to artwork. So, these are pretty simple. My art-soul wants to add free-motion stitching, beads, etc. but this will have to do for now.


These seven hearts represent two days of work. The first day I iron the fabric, fuse scraps of fusible fleece, and stencil. The second day, I print the words, layer front and back, stitch the heart outline, and then cut around the stitching. I have a pair of scallop pinking shears; think I'll try those tomorrow.

There has been a request for a tutorial on printing on twill tape. I am NOT the person who published this idea first, although I had been using it for years before it was published.

OK, Blogger and I aren't communicating well. This is the first time I've tried to embed a tutorial and wanted it to be a pdf so you could download it. However, it will only load as a jpeg. Suggest you drag it to your desktop and enlarge it.

If that isn't sufficient, let me know and I'll be glad to e-mail it to you as a pdf.


Heading to work in a few hours. Who can resist double time and a half rate for 8 hours? I'll be home about midnight. Have a great holiday and let me know if you have questions.

I REALLY hope you decide to make some hearts and share with friends, family, and associates. Passing the joy forward is the goal! (My mom loved the quote "Bloom where you are planted." and would have loved the Joy Jam project as a way to put the quote into action. She's been gone three years now and I continue to celebrate her life and the unconditional love she showed me.)

Sunday, May 27, 2012

Join me in JOY Jam?


Here are the first two hearts for Joy Jam! The roses are painted on bleached muslin and free-motion stitched with yummy variegated threads.

Let me know if you need a step-by-step tutorial. I don't have to go back to work for 26 hours and am in a real stitchin'/photo-takin' kind of mood!


The words are printed on twill tape and stitched to the painted layer before the backing is added.

I'll be working in at least two styles. The other will be rust-dyed fabric with layered texture and the twill tape message.


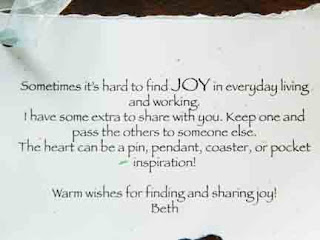
Each heart will have a card attached by sheer ribbon. This is the prototype for the card with torn edges.

Join me in this project? I'd love to post photos of YOUR joyful artwork!!

Saturday, May 26, 2012

Wow! Two posts in a month. Things are definitely looking up!

The larger of the two kidney stones has gone on to fulfill its destiny, and I am thrilled. It wasn't as awful as the rumors, and I'm thrilled about that too!

New things are happening here at the Muttonhead studio and I look forward to sharing photos soon—possibly in the next post. Inspired by a blog post and a comment someone made on Pinterest, I'm embarking on a project called The Joy Jam!

I'll be making 100 fabric hearts with the plan to give a packet of five to each of 20 selected friends and colleagues. They keep one and pass one of the remaining hearts to four other people—literally passing the JOY.

Want to join me? There's plenty of JOY to share!!

Thursday, May 10, 2012

No, I haven't fallen into the abyss. I've been working a lot, trying to dig out of the hole from being out of work for almost six years. I'm so thankful for the time in the studio working, stretching, experimenting! Hopefully it won't be too long until the balance of work and sleep settle down and I can spend some precious minutes with paint and threads again.

Today has been a rather pleasant day. I discontinued the Vicodin yesterday and am mostly out of the pain-meds fog. Between drinking what seems like gallons of water, walking, gardening, and doing whatever else I hope will send the newly acquired kidney stones to the finish line, I've been catching up on blog posts. Some new ones are now on the subscription list, mostly those written by seasoned artists whose style, spirituality, and dedication I admire.

My writing will probably never be profound and eloquent, but I'm grateful for the privilege/freedom/right to pen anything I want without fear of retribution.

So—ART ON!